Through the alders and over the hill and into the pond!
How to make a 4x4 Ford Van,
Details Page
BACKGROUND
Mechanical alteration is nothing
new to me, even as a kid I was cutting my plastic models apart to make
an El Camino out of my Chevy 2 door. As I got older and got my drivers
license I was desperately trying to keep my VW running, but happened to
notice that a VW van motor had a bigger oil pump, oil cooler and bigger
cylinders, hey...
Over the years I had done a few weird projects like this, put bigger motors in various cars where they really didn't belong, transmission and rear axle upgrades, and rebuilt plenty of motors. I had mated a Toyota 5 speed transmission to fit behind my 289 Ford V8, it worked well, also mated a 671 supercharger to a Ford 302 motor. Extensive courses in automotive mechanics, welding,and machining really helped. Most any vehicle I drove had my handiwork on it some place. Headers, suspension mods, different drivetrain components, I have always tinkered with my daily transportation. This was all useful background for converting my van.
Four Wheel Drive Vans
Years ago I had attempted to convert a Dodge van to 4wheel
drive. I had a Dodge 4X4 with a rusty body so I went out and bought a van
to drop on top of the 4x4 chassis. Luckily, before I proceeded too much
further with this project I started measuring things up. I soon decided
this was not going to be too successful due to the frames being a complete
mismatch and the motor oil pan was trying to occupy the same space as the
front differential on the passenger side.
I had never seen a 4X4 van before I considered the Dodge. Later I did see a Chev conversion that was fraught with problems. It became obvious that without some sort of guide, GOOD PLANNING was going to be necessary to complete a project of this magnitude.
My wife and I had bought the Ford van to fulfil our family needs but were not pleased with its winter performance. I had noticed the similarities between the Ford van chassis and that of a pickup. It seemed very possible to readily convert the van to 4 wheel drive.
I measured and remeasured Ford vans and four wheel drive trucks before spending a dime on this project. Preliminary measurements indicated things should fit. A transfer case would easily fit. With the van motor's natural offset to the right, there should be room on the left side for the front differential.
As it turns out, this is a common factor with all van conversions. I don't know if Quigleys http://www.quigley4x4.com/ uses Ford front axles to do their Dodge and GM conversions, but a "Pathfinder" GM van conversion belonging to James Curio uses a Ford style (drivers side differential) front axle and Ford style New Process 205 transfercase. This may be the clear way to go to make a GM or Dodge 4x4 conversion van. I can see the run on old Ford 4x4 F250s now...
Through the alders and over the hill and into the pond!
PURPOSE
Before buying any parts or removing one bolt I tried to get a clear
idea of what I was expecting out of my van. I wanted winter safety with
an excellent back woods capability, I did not want to compromise the fact
that this is our daily use family station wagon. It has to go on long trips
regularly and I would expect it to handle and ride normally. An extremely
high lift or high maintenance was definately out on this this combination
highway cruiser / Mom's wagon / wilderness exploratory vessel. This van
does not have to survive severe off road pounding, jumps or highpowered
wheel spinning bursts through mud.
You have to set goals and decide your purpose. Do you want a 4 wheel drive van for winter touring safety, really rough offroad use or just to be the most awesome vehicle on your block? Decide your purpose and build it to suit your needs.
COMPILING INFORMATION
I started compiling a notebook of ideas, notes, drawings and measurements.
I photocopied any magazine articles that pertained to Ford drivetrains.
I used Highlighter markers to make the important points stand out in my
ever increasing file.
SETTING YOUR SPECIFICATIONS
The best approach would be to look at where you want to be and figure the
best way to get there. What motor, transmission and transfer-case do you
want? What wheelbase, long or short? Do you want an extended van? Sliding
or hinged doors? Regular seats or customized camper? What options? A/C
front and rear? Power locks? Captains seats? If you think a 4 wheel drive
van will meet your needs then start drawing up the specifications of what
you want that van to have. Make your list and approximate your costs. See
how close you are now and investigate options. It may be better to sell
your present van and start with a van that already has 90% of what you
want, than to try to add all the options you want AND 4wd..
DRIVETRAIN CONSIDERATIONS, MOTOR / TRANSMISSION
The extra weight, the lift and drag of the 4 wheel drive gear will draw
some power, so you had better have plenty to start with. If your power
is marginal with 2 wheel drive it will be non-existent when you bolt in
the additional gear. A motor swap, performance mods or lowering the differential
gear ratios are your only options. A six cylinder or 302 might work if
you have a relatively low gear ratio and a lightweight van. For fuel mileage
a diesel might be the best idea.
This could be a good time to upgrade your transmission. You are going to have to buy a transfercase and at least some parts to fit it to your transmission, it may be a good idea to buy the whole transmission and transfercase together and at the time to consider upgrading to a 4 speed automatic. Keep in mind if you switch to an overdrive transmission you can drop quite low in your choice of differential gears. 4.11 or 4.56 gears would work well with an overdrive transmission. A nice feature of an overdrive transmission is the wide range of gearing it gives you. Combined with lower differential gears and the low range of your transfercase you have the gearing to crawl through or pull anything.
A manual transmission would be a lot of trouble hooking up the clutch linkage if you don't have one in place already, but it is possible.
The old C6 3 speed automatic and cast iron New Process203 (full-time) or New Process205 (part-time) transfercases are a tough combination and have strength and reliability to recommend them. In addition to their reliablity, they are cheap to repair if they ever do break. This is an important consideration with me where we travel a lot. A $200 saving in fuel on a cross-country trip would be sadly offset by a $2500 transmission repair in some out of the way place. Simple is often better and I am going to stay with my trusty C6 3 speed automatic transmission.
A neat trick from Dave in Virginia:"low gearing for
the C6 transmission from the E4OD transmission"
"this is a "kit" you can buy from your Ford dealer from
Ford's Motorsport catalog Part number M-7398-B.. It was expensive, I think
it was $400.00 but I could be wrong. You must rebuild the trans to change
a few gears. The result is a 20% lower first and a 15% lower second, third
is still one to one, I think those are the numbers."
DRIVETRAIN CONSIDERATIONS, TRANSFERCASE
Personal choice enters in here. I wanted strength and durability and
I like fulltime 4 wheel drive. There was no other choice for me, the old
1970s cast iron New Process NP203 transfercase.
Most people spend very little time in road conditions so bad that they require 4WD so that a part-time system makes economic sense. Hard to beat the old 1970s cast iron part-time NP205 (or the full-time NP203) transfercases for strength and durability but any of the new aluminium transfercase boxes will do if you are careful to not drag them across the rocks (or use skid plates). All the new units use lighter fluids and are supposed to have less drag.
One hint with either transfercase is to use synthetic gear oil in it if it is working fine and doesn't leak. It is probably due for a change of fluid by now and if you change the fluid now you don't have to change it for quite a while and lots of miles, unlike motor oil.
Synthetic gear oil in the transfercase and both axles (and transmission if it is a manual) will noticably reduce your drivetrain friction, especially in cold weather. Fuel mileage and performance will noticably improve.
You will probably have to buy the transmission with the transfercase to get all the parts to get them hooked together. As mentioned above, this could be a good time to upgrade your transmission. The 300six, 302, 351w and 351c transmission bellhousings are interchangeable but the flywheels are not due to different balancing of each. The 460, 400 and 351m have their own belhousing pattern and the diesels each have their own separate bellhousing boltpatterns. The old 352, 360, 390, 410, 427, 428 FE bigblocks have a different sort of half round bellhousing pattern as well as the fact that they were never offered in vans, only pickups and cars. The rear shaft and tailhousing out of any C6 automatic transmission will fit in any other C6 auto even if the cases (and integral bellhousings) won't fit. If you have the transmission out, this would be a good time to have the transmission and transfercase checked out mechanically.
Stay away from separate (divorced) type transfercases if you can. They are too long causing too short a rear driveshaft (too sharp a universal joint angle), too far back and too susceptible to misalignment destroying the center shaft universal joints and causing vibrations.
DRIVETRAIN CONSIDERATIONS, REAR AXLE and AXLE RATIO
I feel it is best to stick with a E250 or E350 van rear axle. The springpads
and shock mounts are in the right positions. The van axle width and differential
offset are of course perfect. The bigger brakes (over the E150) are better
for stopping with the extra weight and big tires. The stronger drivetrain
builds in more reliability. The extra weight and cost over E150 axles are
minimal. The F250 or F350 front axle will be the closest choice to the
proper width without expensive modification.
Keep in mind you have to match the front and rear gear ratios. If you plan to go to larger tires or have marginal power, lower gears in both might be advised. Good planning or lots of dollars will solve this for you. If you want lower gearing than you presently have in the van, purchase a front axle that already comes with the gear ratio you want and then buy new gears for your present van rear axle to match. If you are happy with your present van gear ratio, find a front axle to match or plan on buying a set of gears for it.
Pickup truck rear axle
It would be nice if you could just swap in the F250 or F350
pickup rear axles into the van. Maybe you can, I don't know. I am sorry
but I just don't have any experience with this and did not look into it
at all. Can any body help us here?
DRIVETRAIN CONSIDERATIONS, FRONT AXLE
I really recommend the Dana 60 solid front axle in
either F250HD or F350 types. Ford vans carry a lot of weight on the front
axle and off roading is hard on running gear. The 3/4 ton Dana 44 front
axle is really no stronger in most repects than the 1/2 ton Dana 44 front
axle but the 8 bolt rims and bigger brakes are still a better deal if you
plan to use bigger tires and push the van into rough spots, heavy loads
or high speeds. For light use the 1/2 ton gear might do fine. The biggest
problem is that the 1/2 ton Dana 44 front axle is not wide enough and will
probably cost more than a Dana 60 to get widened. From my notes, compared
to my E350 van:
1973-79 F150 solid front axle (Dana 44) is 4" too narrow
1973-79 F250 solid front axle (Dana 44) is 1" too narrow
1973-79 F350 solid front axle (Dana 60) is just right
1980-95 F150 IFS front axle is 2" too narrow
1980-95 F250 IFS front axle is just right
1980-95 F350 solid front axle (Dana 60) is just right
Unfortunately the 1/2 ton Dana 44 (solid) front axle is too narrow for the Ford van front end. It could be widened but this would be expensive. The Dana 60 is the perfect width for the Ford. It is strong but pricey and heavy. I like the idea of IFS. Lets face it 95% of our miles are on pavement. Solid axles are tough though. Installation and alignment are simple too. Coil springs offer better flexibility and better noise/harshness isolation than leaf springs. Coils would be my choice for a conversion, but for this conversion I needed simple and strong and right the first time. It was hard to beat the straight axle and leaf spring setup of the 1979 and earlier F250. Only the two front spring eyes needed to be located accurately to get good alignment.
Try to make sure your calipers, rotors, dust shields, knuckle universals and driveshaft splines are all in good shape when you purchase your front axle or be prepared to replace them. Look for a front axle with the gear ratio you want. The front or rear gears can be changed, but at a cost of about $300-500 US each.
Steering:
Steering was going to be a problem because the
1979 and earlier F250 trucks used a "fore/aft" steering box whereas
the vans all come with "left/right" steering boxes like all the
1980 up IFS trucks. The solution was to use a late model F350 tie bar (bought
NEW $300 ouch!) that has a socket eye over on the passengers side for a
drag link to the steering box. The tapered ends on this "tie bar"
or "link rod" are a bit smaller than the tapered sockets in the
spindle arms. Take the two different sized tierod ends to a machine shop
and they can machine up adapter bushings for you in no time. Epoxy or lock-tite
the bushings into the spindle arms and anti-sieze the tierod end when you
assemble them. I want to thank Jim George and SCOTIA MACHINE for all
their help along the way.
The draglink is made from the long one that has been removed from the van front suspension. Have a machine shop cut it off to the right length and thread it for the adjuster sleeve.
A dropped pittman arm would help to get rid of bumpsteer or a track rod or panhard rod linkage could be used to positively locate the front axle in a side to side fashion. I really didn't find any of these methods necessary with the 2 or 3 inch lift.
An alternate idea used by David was to fit a short draglink to a modified arm on top of the drivers spindle assembly. This modified upper spindle arm would come forward instead of to the inside like the original. The steering box would still work in a side-to-side fashion on it.
CUTTING THE UNDER ENGINE CROSSMEMBER
I did not like the idea of cutting
the under engine crossmember. It really is an attack on the design and
integrity of the van's frame. However, unless you want 4 to 6 inches of
suspension lift and limited suspension travel (and your Vehicle Inspection
Department will allow it), you will have to cut or reshape your under engine
crossmember at least to some degree. I cut up past where the motor mount
fitted on the drivers side and installed a new bolt in section for differential
and driveshaft clearance. I also trimmed the front edge of the crossmember
under the motor. This much trimming may not have been necessary.
If you are planning a swap to 1980 and up Independent Front Suspension I suggest looking at replacing the van crossmember with the one from the pickup. It is not a direct replacement and will require some fancy metalwork. I would love to hear from somebody who has done this.
CONDITION of PARTS and VAN
Consider carefully that you are going to spend a lot of effort, time
and a considerable amount of money on this project. You would want the
effort to please you for a long time to come. Start with the best possible
parts and the best possible van to meet your needs for a long time to come.
If you are pleased with your van, it has the options you want and it is
not rusty, then stick with it. Otherwise it might be best to sell it and
start with one that will please you and last in the years to come.
It is kind of nice all these vans from mid 70s to early 90s look the same, so that if you have an older van in good shape it will still look up to date.
SUGGESTED WORK ORDER
This is the order I would suggest doing the work to
convert the van:
1) Preparation
2) Rear suspension raised
3) transfercase installed, rear driveshaft cut to length
4) crossmember modified, front suspension attached, and steering linkage
and driveshaft installed
(5) There may be some certification work nesessary for your province or
state, be prepared.
1) PREPARATION Gather all your info and look into part prices. Decide what parts you are going to use (gears, transfer-case, transmission, tires, and front axle). Find a good professional welder who will work patiently on your project for reasonable prices. (You will be bringing the parts to be welded to him) Find a machine shop or machinist who will do driveshafts, steering linkage and drill large holes for you. Quality work is more important than cheap prices.
BEFORE YOU PROCEDE make sure you know what is going to be necessary to get your van certified roadworthy for your province or state. Find out how and who approves such modifications (if approval is going to be necessary). Best to talk with the approving engineer personally beforehand to find what he wants to see in a good conversion. Talk little and listen a lot.
2) REAR SUSPENSION Raising the rear suspension is necessary and is the easiest task. A stock E250 or E350 axle is used since it is the right width. If you are using your stock axle you do not have to disconnect the brakes or cables. The Ford van only needs to be lifted 2inches minimum and a 3inch lift will easily allow 35-12.5 R16.5 tires without undue rubbing or sacrificing cornering stability. Replace the U bolts with longer new ones and install lift blocks under the springs. I used stock 1/2 ton and 3/4 ton 4X4 blocks at 2inches and 3inches each. $50 for NEW U bolts and nuts and $20(at a junkyard) for the lift blocks. Shock upper extensions or raising the lower mount will be needed. Less than $20. All of this work should take an afternoon. Van will look a bit odd jacked up in the rear but it is still driveable and you're ready for step #3.
3) TRANSFERCASE Installing the transfercase/transmission is an easy item, and if you get cold feet, it can be replaced or left in without hurting your resale value or function of your van. Complete 300/302/351w units interchange and are very common. The 351m, 400, 429, and 460 bellhousings will interchange with each other as well. Remember though, that you must get a flywheel designed for your engine size since all but the 300six are externally balanced. If you can find the transmission/transfercase combo you want it is a simple but heavy swap. One afternoon and a buddy will have it in place and an evening will have shifter and speedo-cable in place.
My diesel has an odd bellhousing (for the diesel) C6 transmission. The transmission had to be disassembled to install the rearshaft and tailhousing. I paid $300 to have experts check my transfer case for wear and install it behind my transmission. The original van crossmember bolted under the frame with a 1" spacer in new holes that had to be drilled in the frame. This transfercase comes very close to the floor and a thicker or no spacer may be nesessary with a different type case. The 203\205 transfercase side mount is not needed. (I did originally mount a custom made one but it tended to transfer too much of the diesel's vibration to the frame)
I had to make up a longer speedometer cable by splicing two together with a new overlong core. I used an 8" offset bar on the shifter and a rubber boot on the floor. When I got my driveshaft back, I was driving again! In 2wd but with dual ranges!

Transfercase shifter offset detail, derived from a
Haynes Automotive Repair Manual sketch
this will put the shifter over by the drivers seat instead of on the passengers
side.
I really recommend using this as an opportunity to upgrade your 3speed C6 to a 4 speed with overdrive AOD and the new aluminium part time transfer-case if you wish. See the comments on the pros and cons of each. Measure up for your driveshaft and have it cut ($50).
This part of the project cost $680 and only had the van down for 3 days. I hardly got dirty. Used new universal joints and bolts.
4) FRONT AXLE Search your soul because there is no backing out after this! Rent, buy, or borrow torches and cut off your front suspension! I opted for a solid/straight Dana 44 axle and leaf springs as the simplest/cheapest conversion. Specific details will vary depending if you are going to install solid or IFS, leaf or coil springs but suffice to say you are going to permanently remove all your present front suspension and much of the drivers side under engine crossmember to gain clearance for your differential.
A simple crossmember is added under the radiator to assist frame rigidity. The motor is unbolted from its mounts and a new piece of drivers side under engine crossmember (including a drivers side motor mount) has to be made for the drivers side and bolted in. This is to assure clearance for the front differential on the drivers side. Spring mounts are fabricated and bolted to the front of the frame. Shackles are made for the rear and swing in the triangular rubber bushing mounts that were rivited on the donor truck frame, these are mounted on a braced plate which bolts in the same spot as the old "A" arms did. This is a good time to call Energy Suspensions to order and install Polyurethane bushings for your spring eyes and pivots. This should eliminate any tendency for the front axle to shimmy from worn out or softened rubber bushings. Voice of regretful experience talking here folks.
Spring pads are made and welded to the top of the axle (6 inches wider to match the frame). Idrilled the spring centerbolt holes and inch and a half to the rear on these spring pads so that I would not have so much leaf spring sticking out in front of the grill. You MIGHT have to change your left exhaust manifold (I did on the diesel, and the oil cooler/filter mount assembly for one off a pick-up).
My drivers exhaust pipe came down straight through the driveshaft so I used a truck (driver's side) exhaust manifold and oil filter/cooler. Unless you have a diesel I don't believe you will have this problem. The engine crossmember and drivers motor mounting pad did require some modification for differential clearance though. The motor mount is still original.
Roll the axle underneath and bolt it up to the springs and their hangers. 1978 F250 front shock absorbers are used and mount to the stock van location at the top and to a 5/8 inch hole in a tangentally mounted tab welded to the rear of the axle tube. Again I recommend using Energy Suspensions polyurethane shock or swaybar bushings and reinforced washers here. No, I don't work for the company, I just like their products.
A late model F350 tie bar (bought NEW $300 ouch!) that has a socket eye over on the passengers side for a drag link to connect and a shorter draglink machined out of the old drag link from your van complete the steering. Bolt the brake flex lines to the calipers and you are driving again! Measure up for your front driveshaft and take tranquilizers to quell the excitement!
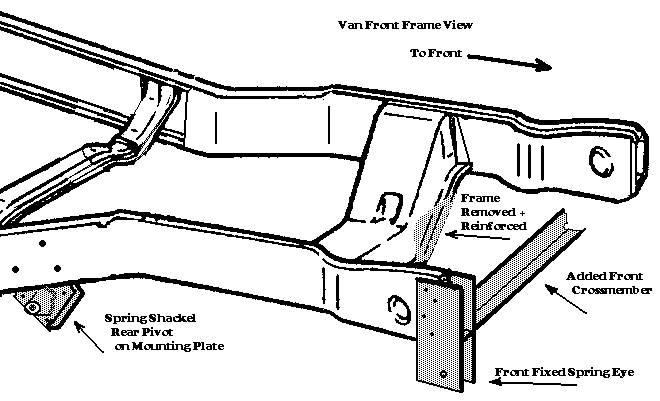
Front of Frame View, derived from a Chilton Automotive
Repair Manual sketch
Showing (on the closest side in grey) details of changes made to convert
the van to 4wd.
Step #4 is a lot of work, if you didn't like/couldn't do steps #2 and #3 then you will know not to tackle #4 and can go back. My total cost was $3000cdn using many new parts. It took a day for step #2, 3 days for step #4, and 6 weeks of evenings of slow experimentation to do step #4. This time could have been cut at least in half if I had ever seen a Ford conversion and had a clear idea of what was going to work. There are shops that can do this for you but the price is about $7000 US. All my prices are in ($0.75 US) Canadian dollars. You could do this without altering the engine crossmember if you don't mind a 4inch to 6inch lift. I wanted a very practical vehicle with lots of suspension travel. I built it 2inches higher at first, then lifted it another inch later, mainly to use big 35inch tall tires.
(5) CERTIFICATION work may be necessary for your province or state, be prepared. If you have talked with the approving engineer beforehand, you already know what he wants to see in your conversion. Give it to him to the letter. If you have done a good job and followed his recommendations this step should be a mere formallity.
I'd like to thank Larry Hogan and Bob McSwiggin for their help in putting this page together.
http://www.quigley4x4.com/ , Professional 4wd van converters.
Comments or questions? Contact me at sbest@glinx.com
I am especially interested to hear from anybody who has ever owned or made
a 4wd van.
Has anybody out there tried an Independent Front Suspension swap from a
1990 or newer truck?